Using Jenkins As A Build Step

The problem

Capistranos rsync module was deprecated and you were now expected to run git commands on the end server. I wanted to change this so I didn’t need to install extra packages on the server and let jenkins build step run any extra steps like minification.

The Solution

There is an alternative to capistrano, Deployer. Migrating to use deployer over capistrano allows deployment via rsync whilst maintaining the ability to run extra hooks/steps around the deployment.

Steps

First, install the deployer php package:

composer require --dev deployer/deployer

Second create a deploy.php file:

<?php
namespace Deployer;

require 'recipe/common.php';

// Config
set('keep_releases', 5);
set('rsync_src', __DIR__);
set('release_path','/var/www/somewebsite/prod');

add('shared_files', ['file_one.php', 'file_two.php']);
add('shared_dirs', ['folder_one']);
add('writable_dirs', []);

// Hosts
// Set an identitykey in /home/user/.ssh/config or ~/.ssh/config
host('prod.somewebsite.com')
    ->set('remote_user', 'deploy')
    ->set('hostname', 'prod.somewebsite.com')
    ->set('port', 22)
    ->set('deploy_path','{{release_path}}')
    ->set('rsync_src', '{{rsync_src}}')
    ->set('rsync_dest','{{release_path}}');
// Build step - Minify CSS and JS
task('setup:minify', function(){
    writeln('<info>Minifying CSS and JS before uploading</info>');
    runLocally('bin/ravensholde -o setup:minify');
});
    
// Override deploy - to use rsync rather than git pull
task('deploy:update_code', function () {
    writeln("<info>Uploading files to server</info>");
    upload(__DIR__ . "/", '{{deploy_path}}' . "/releases/" . "{{release_name}}", ["options" => ["--exclude-from=deployment-exclude-list.txt"]]);
});

// Override symlink - to point to correct folder
task('deploy:shared', function () {
    $sharedPath = "{{deploy_path}}/shared";
    // Symlink Folders
    foreach (get('shared_dirs') as $dir) {
        run("{{bin/symlink}} $sharedPath/$dir {{deploy_path}}/releases/{{release_name}}/$dir");
    }
    // Symlink Files
    foreach (get('shared_files') as $file) {
        run("{{bin/symlink}} $sharedPath/$file {{deploy_path}}/releases/{{release_name}}/$file");
    }

});

// Tasks
task('deploy', [
]);

// Hooks
// Before
before('deploy:update_code', 'setup:minify');
// After
after('deploy:failed', 'deploy:unlock');

Next, on the jenkins server we update the jenkins ssh config to add the new host

Host prod.somewebsite.com
  HostName [x.x.x.x]
  User [deploy]
  IdentityFile [/path/to/ssh/key]
  SetEnv TERM=xterm-256color

Lastly we adjust the jenkins build step to include setting up composer and deploying via deployer

composer install
composer dump-autoload
./vendor/bin/dep deploy prod.somewebsite.com

Now we can run build steps on jenkins, before we push the code out to the server!
Rewriting For Cleaner Code

As Ravensholde approaches Public Beta, I wanted to refactor the games structure to match more like what a professional app would be like.

The file structure is as follows:

Classes
  Blocks
    Block
  Controllers
    Controller
  Database
    Connection
  Helpers
    Helper
  Models
    Model
 Templates
  Admin
  Base
  Game

With composer.json setting the autoload PSR for the Classes.

Index.php has been re-written to work as a router, like so (pseudo code to illustrate):

<?php

require 'vendor/autoload.php';

use Classes\Blocks\Block;
use Classes\Controllers\Controller;
use Classes\Database\Connection;
use Classes\Helpers\Helper;
use Classes\Models\Model;

class Index {

    protected Model $model;
    protected Helper $helper;

    public function __construct(
        Model $model;
        Helper $helper;
    ) {
        $this->model = $model;
        $this->helper = $helper;
    }

    public function execute()
    {
        session_start();

        // A router for a template
        $this->helper->addRoute('method', 'url', function(){
            $model = $this->model;
            $helper = $this->helper;
            $block = new Block($model, $helper);
            require_once('templates/base/template.php');
        });

        // A router for a controller
        $this->helper->addRoute('method', 'url', function(){
            $model = $this->model;
            $helper = $this->helper;
            $controller = new Controller($model, $helper);
            echo $controller-execute();
        });
    }

}

// Only create one connection to be used throughout
$mysqliAdapter = new Connection();
$mysqliConnection = $mysqliAdapter::connection();

// Initialise models and helpers
$model = new Model();
$helper = new Helper($model);

// Initialise the router
$index = new Index(
    $model,
    $helper
);

// execute the router
$index->execute();

This has made the code base much cleaner, and will be far easier to maintain long term.

Building The Web Server

To achieve the best performance of a website, I set out to choose the right software stack.

Firstly, I installed varnish as a full page cache. This required a few configuration changes at:

/usr/lib/systemd/system/varnish.service
ExecStart=/usr/sbin/varnishd \
          -j unix,user=vcache \
          -F \
          -a :80 \
          -T localhost:6082 \
          -f /etc/varnish/default.vcl \
          -S /etc/varnish/secret \
          -s malloc,2G

We change -a to 80, so it listens on port 80 for incoming requests, and we change malloc to 2G to allow it access to more RAM.

Secondly, I installed nginx as the web server, and set nginx to listen on port 8080.

Thirdly, I installed php 8.2 and 8.4 for the different websites. Some configuration changes I made are listed below:

memory_limit = 4G
opcache.enable=1
opcache.memory_consumption=128
opcache.interned_strings_buffer=8
opcache.max_accelerated_files=4000
opcache.revalidate_freq=60

This gives PHP more memory, and enables PHPs opcache for better performance.

Next I installed redis, as another caching layer. I set a password for authentication.

Lastly, I installed mariadb.

CI/CD With Jenkins

With a recent announcement, Bitbucket stopped dedicated IPs on pipeline runners for free personal projects. As I didn’t want to adjust the firewall to allow all traffic in (Although it still needs SSH authentication) – I decided to get a jenkins server up and running.

  • Created a new cloud server
  • Added it to the existing network
  • Added the existing firewall rules for home SSH
  • Created a new firewall rule to allow jenkins ssh access to the dedicated server
  • Connected Jenkins build to my git repo
  • Configured Capistrano (and gems) to run the deployment
  • On build finish run bundle exec cap production deploy

Server Infrastructure

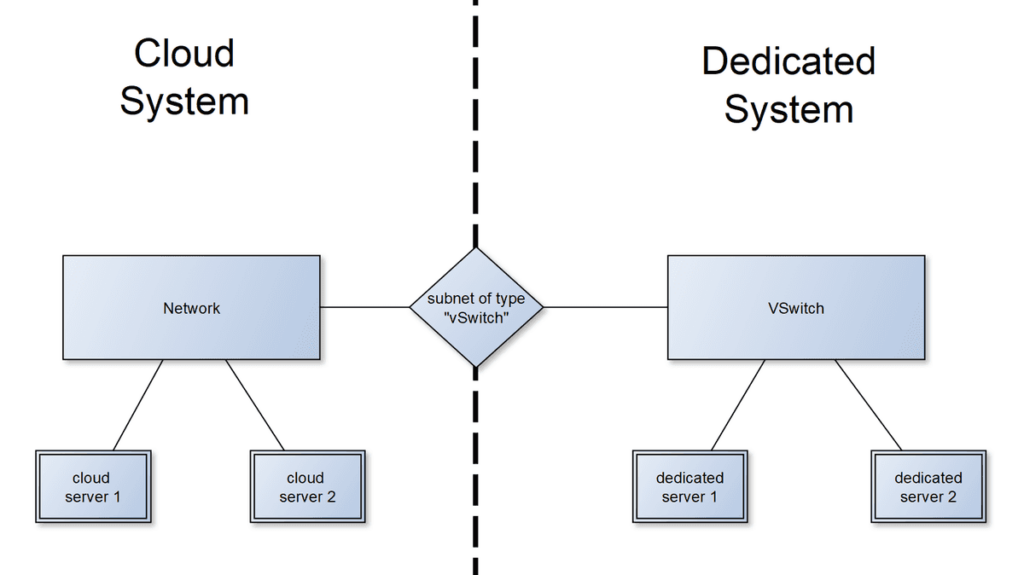
To host the myriad of websites I run, I had been using AWS. i recently noticed that the performance for what I was paying wasn’t great. I set about to migrate from AWS to hetzner, and make use of a dedicated server for the same cost as what I was paying in AWS.

My infrastructure looks like this now:

To achieve I followed the guide https://docs.hetzner.com/cloud/networks/connect-dedi-vswitch/ and these are the steps I took:

  • Created a new NginxLB cloud server
    • Set up nginx and certbot to handle web traffic on this server.
  • Set the firewall to allow my home SSH and web traffic (80/443) through to the LB server.
  • Created a dedicated hetzner server
    • Used rescue image to install ubuntu 24.04
  • Set the firewall to allow my home SSH through only.
  • Created a vswitch
    • Created a subnet
    • Assigned the dedicated server to the vswitch
  • Set up a cloud network
    • Added a subnet with the vswitch attached
    • Allowed routes to be shown to this subnet
  • Adjusted the dedicated server firewall to allow ports 80 and 8080 traffic through from the private IP of the LB server.
  • Adjusted the dedicated server firewall to allow ephemeral ports through – for loopback calls.

I now have a cloud server which is open to http and https traffic, that pushes the traffic to a dedicated server that is only open to the private network and not public facing.